
Cabinet Painting Sacramento can be a rewarding project, but there are some things you should know before starting. The first step is to remove all cabinet doors and drawers. Next, wash and scuff sand all surfaces that will be painted.
Finally, prime all surfaces to be painted with a bond coat or a tinted primer. This will create a smooth surface that paint will adhere to.
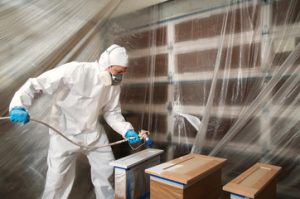
Cabinets see a lot of wear and tear. Whether you’re opening and closing them on a daily basis or just leaning against them, cabinets are exposed to moisture, heat, and dirt. Because of this, they need to be painted with a hard-wearing material that’s resistant to chipping and staining. This is why cabinet paints are typically more durable than wall paints. They also need to be sprayed.
Before the first coat of primer is applied, your cabinet must be thoroughly cleaned. This can be done with a degreaser like Krud Kutter or TSP (trisodium phosphate). Grease is the most common cause of peeling, so it’s important to make sure that all grease is removed from the surface. Then the cabinet must be sanded. Ideally, it should be sanded down to bare wood to create the optimal adhesion layer for the primer and paint.
You can use a hand-held electric sander to make this process easier and quicker. However, you’ll still want to sand by hand on any corners or narrow panel parts that are difficult to reach. You should always clean away any dust from surfaces after sanding with a shop vac and a tack cloth. This will ensure that the surface is dust-free before painting begins.
There are many different ways to prepare a surface for painting, including sandblasting and power tools like the MontiPower tools. These can be especially useful when it’s not possible or safe to remove the cabinet from its location. These tools can also help when a surface is too heavily rusted to sand it down, or where regulations prohibit the use of a blaster with loose abrasives.
Once your cabinet is prepped, you can begin the actual painting. It’s best to do this in a garage or another well-ventilated area, since cabinet painting is a messy job. For this reason, you should set up a work station that can be dedicated to the project. Then, lay down drop cloths to protect the floor and other surfaces in your home from paint drips. Once your paint is dry, you can reattach the cabinets and enjoy your kitchen’s new look.
Primer
Cabinets get a lot of use on a daily basis. They are opened and closed, touched, wiped down, exposed to spills and moisture, and more. This kind of use requires a durable finish that is resistant to chipping, scratching and staining. To help achieve this, a primer is used. The right primer will create a bond with the existing cabinet surface and provide a solid base for the new coat of paint. Without a strong undercoat, your freshly painted cabinets may chip or peel within a year or so.
To ensure that your cabinet painting project succeeds, it’s best to choose a product specifically formulated for kitchen cabinet refinishing in Vaughan. A commercial oil-based primer will give your cabinets a solid foundation that resists staining, chipping and peeling. It is also formulated to stand up to frequent opening and closing of cabinet doors and drawers.
A good quality primer will also help your new paint job last longer by providing a smooth, even surface that is easy to wipe down and keep clean. This is important because your kitchen is one of the most heavily used rooms in the home.
After the primer is dry, you’re ready to apply the cabinet paint. Make sure to use a top-quality cabinet paint, such as Fusion Mineral Paint Ultra Guard, or Zinsser B-I-N Shellac Primer, that’s low odor and provides a durable, glossy finish.
Depending on your desired look, you may also want to consider updating the hardware for your cabinets. You can find a variety of different cabinet hardware products online. Be sure to clean the existing hardware with a degreaser before priming and painting.
Cabinet painting is a project that takes a lot of time and effort to accomplish. Unless you have the necessary skills and experience, it’s recommended that you contact a professional cabinet painter to tackle this project. A pro will not only guarantee quality results, but they’ll also save you a ton of time and hassle. Attempting to tackle this type of project on your own will leave you knee-deep in primer and paint, sorting through unlabeled pieces of hardware, and weeks behind schedule.
Paint
Choosing the right paint is key to a good cabinet painting job. This includes choosing the type of paint (acrylic, oil-based, or water-based) as well as the finish you want — matte, satin, eggshell, or semigloss. The choice of finish will determine the durability and stain resistance of your new cabinets.
The first step in cabinet painting is to clean the surface of the cabinet boxes and doors to remove any dirt or grease that will interfere with the adhesion of the paint. This step is especially important for the cabinets located above or below a sink, where grime tends to accumulate. A cleaning agent like TSP (trisodium phosphate) is ideal, and it should be used on all surfaces that will be painted.
Once the surfaces are cleaned, sand the cabinet doors and box to make them smooth before priming and painting. It is best to work in a garage or other climate-controlled area for this project, as the process can be messy and dusty. If you have an electric sander, use it to speed up the sanding time and get the job done faster.
For wood cabinets, a primer is essential because it creates an even base for the new coats of paint and covers any imperfections on the wood surface. After priming, sand again using 220 grit sandpaper to ensure that the surface is smooth and ready for the final coating of paint.
Acrylic paint: This is a great option for wood cabinets because it is easy to apply and dries quickly. It is also moisture resistant and durable, so it will hold up well to normal wear and tear. However, it does not have the stain-resistance of an oil-based paint.
Oil-based paint: This option is more durable than acrylic and dries quicker. It provides good adhesion on sanded softwood and resists mold, mildew, and other stains. However, it requires more effort to prepare and clean than other types of paints.
If you choose to go with an oil-based paint, a good quality sanding sealer is also recommended to protect the surface and prevent stains from bleeding through. If you’re not comfortable doing the prep work and painting yourself, hire a professional to achieve the best results.
Finish
Cabinets are a major focal point in any kitchen, and a bad paint job can ruin the entire look. The best way to ensure a high-quality finish is to take the time to prepare the surface, sanding it smooth and priming before painting. This is a labor-intensive task, but it’s well worth the effort to ensure a long-lasting and attractive new finish.
Depending on your preferences, you can choose between a paint or stain finish. A painted finish allows for a greater range of color choices than wood stains and is also easier to remove if you want to change your style at a later date.
However, a painted finish is more likely to chip or show wear over time compared to a stained finish. To minimize these problems, it is important to use a quality primer designed for cabinets, such as KILZ 3(r) PREMIUM Primer. This primer helps to ensure excellent adhesion between the surface and the new paint, reducing the chances of future peeling or chipping. It also contains mildew-resistant properties, which are essential in moisture-prone areas like the kitchen.
Once the primer has dried, it’s time to apply the cabinet paint. There are many different options available, including semi-gloss and eggshell finishes. Benjamin Moore recommends Advance(r) Interior Semi-Gloss in Satin Enamel for a beautiful and durable finish that’s easy to clean. Whatever finish you select, be sure to follow the manufacturer’s instructions carefully.
When applying the paint, use a cabinet roller for an even application. You can also use a brush for hard-to-reach areas or corners. After each coat, lightly sand the surface with 220-grit paper to make sure it’s smooth before adding the next one.
Unlike wall paint, cabinet paints contain more resins that add durability and resist stains and scratches. They are also formulated with special pigments that help to camouflage imperfections and provide a high-quality finish. As a result, they are often more expensive than regular wall paint.
When choosing a color for your cabinet paint, keep in mind that darker colors will warm up the space and lighter shades will cool it down. Also, remember that it will take significantly longer for cabinet paint to dry than wall paint.